The demo is based on a data package available in various formats (ShapeFile, SpatiaLite and PostGis).
Upload the ready-made QGIS project or use this data to create your cartographic project by defining all the aspects you prefer.
Access the G3W-SUITE Administration Panel, publish the QGIS project as WebGis service and manage tools and features.
Demo based on the follow services:
https://www.naturalearthdata.com
This version of G3W-SUITE is deployed for QGIS 3.4.x LTR version.
Download demo data and QGIS project, data avalaible in various formats:
A dataset copy is available on the G3W-Suite server.
Data are in EPSG: 3857. The projects are made with QGIS 3.4.x LTR.
In the demo you can use your data only if you use data on a GeoDB.
Open the QGIS project available on demo data.
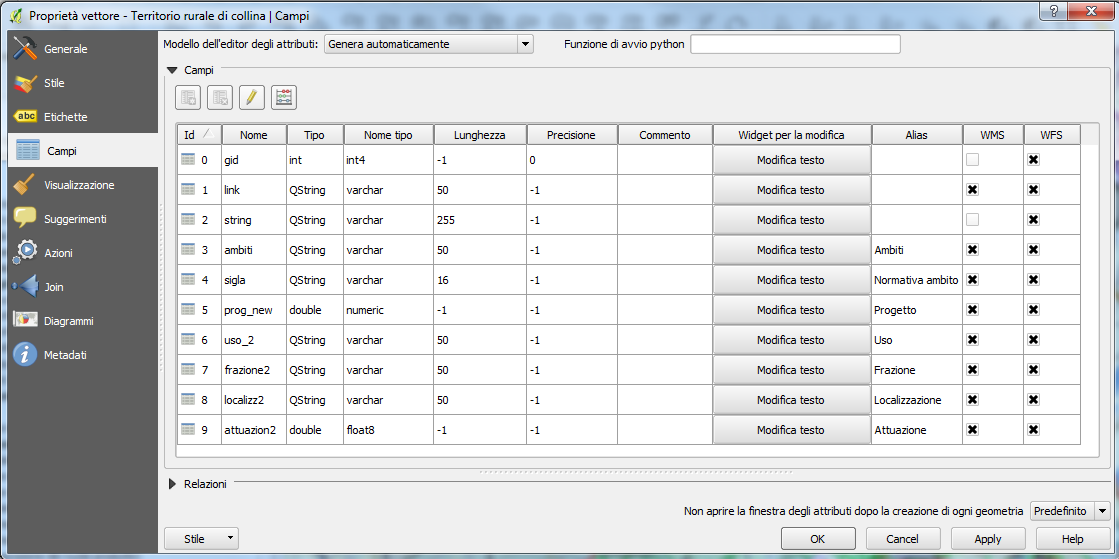
You can modify alias, style, label, visibility interval…of the various layers.
For every layer you can decide which field has to be consultable from WebGis. For every field you can choose an alias.
Manage this aspect from the section Field on the Property window.
From the menù Project -> Property you can manage this aspetcs:
You can set Project title: it will be the header of the WebGis
N.B. Every projects must have a different title if you want that it be published on G3W-Suite. Remember to rename it if you have problems on upload.
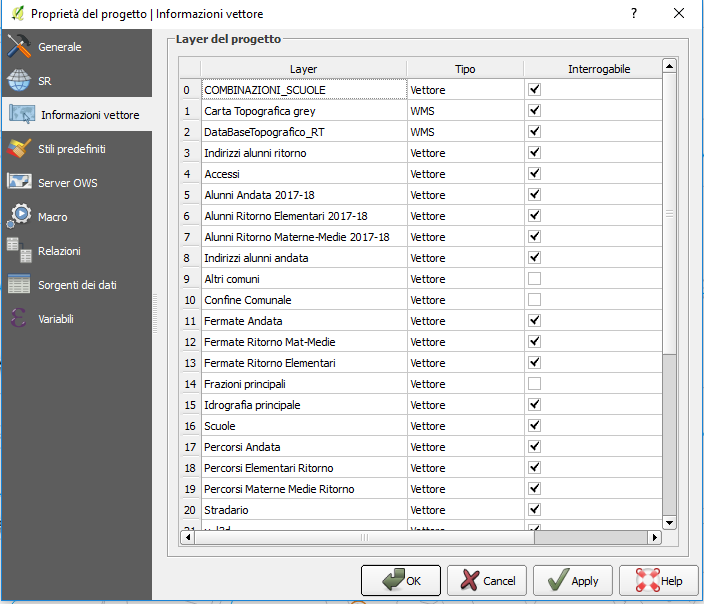
Set which layer will be queryable from WebGis.
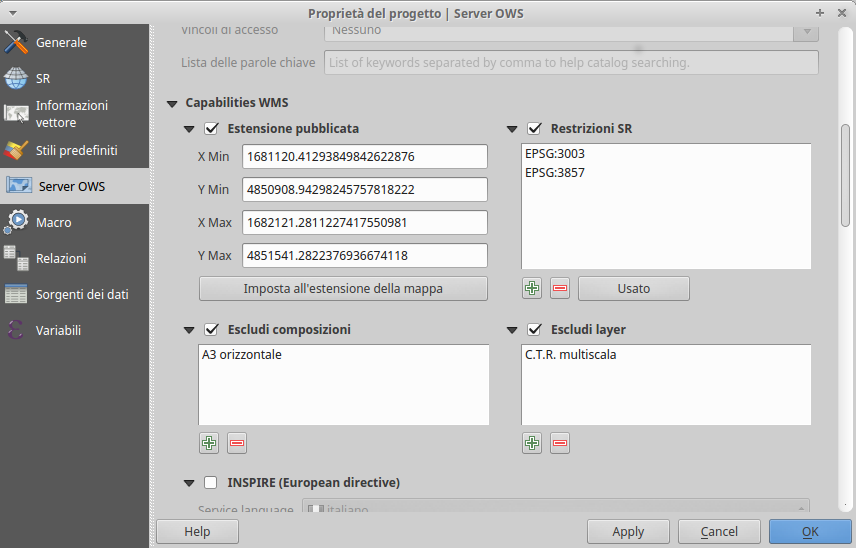
Set the Service capabilities as you prefer, this info will be published on Metadata section on the cartographic client.
Set the WMS Capabilities:
Advertised extent: initial map extension of the WebGis service
Any CRS restrictions: CRS available
Exclude composer: any print layout composer which must not be available on WebGis
Exclude layer: any layers which must not be available on WebGis
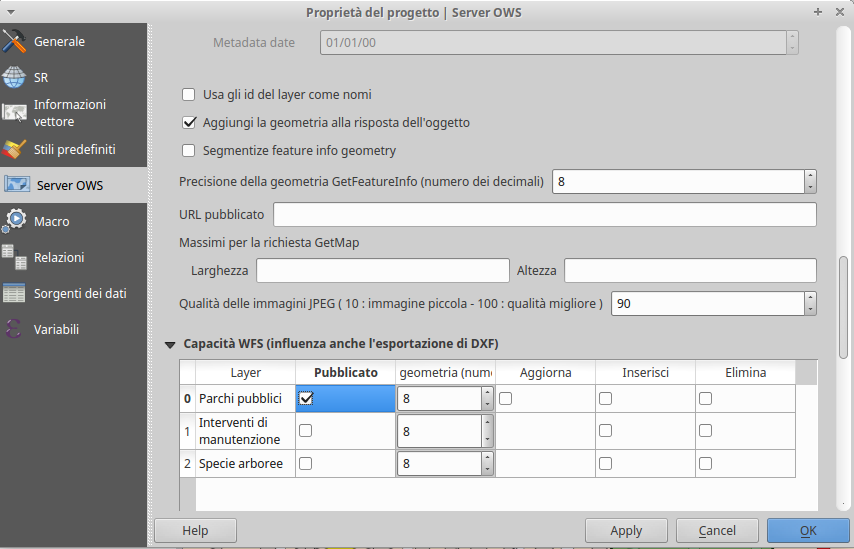
To speed up client responses, enable the Use layer ids as names option.
If you want active the auto-zoom function you have to check the Add geometry to feature response option.
If you want use bbox and polygon query tool, you have to set WFS Capabilities (only Published) for the queryable layers.
Access to the G3W-SUITE application through Firefox or Chrome browsers:
Choose Login and use the demo profile:
user: demo
pwd: g3w_demo123
Click on Admin section and the on Backend button.
In this section you can:
* create cartographic group: you will can use them to organize your WebGis services
* publish your QGIS project
* create and manage users
If you want to use the pre-configured mapping group, access to Demo Group and read directly the ‘Publish your QGIS project’ paragraph.
Demo Group is associated with EPSG 3857. All QGIS projects uploaded in this group must be associated with the same EPSG.
If you want to create a custom Group, follow the next instructions.
To create a custom Group, go to the left menu Cartogrhaphic Group -> Add Group and fill out the dedicated form.
Name: title of the cartographic group (it will appear in the frontend)
Title: sub-title of the cartographic group (it will appear in the frontend under the title of the group)
Description: a thematic description of the group (it will appear in the frontend as a description of the group)
Language: choose the language of the interface (only english and italian available)
Logo: logo associated at the cartographic group (it will appear in the frontend associated to the group)
Link: URL linked to the logo
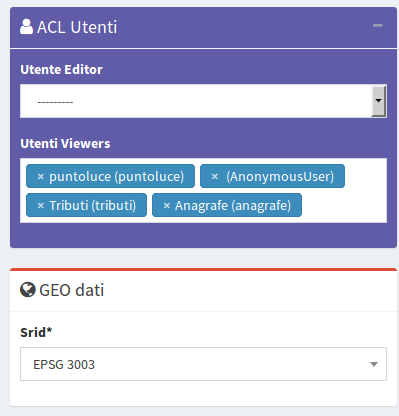
User editor: define the user Editor for this group. This kind of user can manage the features and contents of the group (you can choose a user from those defined as Editor 1)
User viewers: define the Viewer users that can access at the group (you can choose more users among those defined as Viewer 1 o Viewer 2).
For free acces project choose Anonymus user.
SRID: define the projection system associated with this group.
Remember: inside this group you will can publish only QGIS projects with the same SR.
Demo Data are in EPSG: 3857
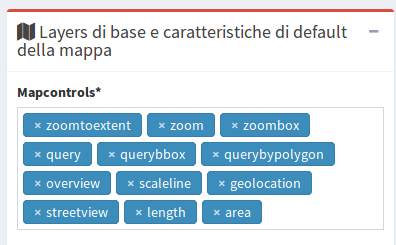
Map controls: set the tools you want to make available to the user for all the WebGis services published within this group:
zoomtoextent: zoom to the initial extension
zoom: zoom in and zoom out
zoombox: zoom tool based on drawing a rectangle
query: classic info tool
querybbox: query using bbox (N.B. the queryable layers must be published as WFS services on the QGIS project)
querybypolygon: the query tool give info about the geometries of the layers that intersect the query polygon (Eg what intersects a cadastral parcel?). – N.B. the queryable layers must be published as WFS services on the QGIS project
overview: set the overview map
scaleline: presence of a scale bar
geolocation: geolocation tool (useful for tablet consultation)
streetview: Google StreetView on your map
nominatim: OSM-based address search tool
addlayers: tool to load on-fly (temporarily) additional layers on individual WebGis services (.shp, kml and geojson)
length: linear distance measurement tool
area: surface measurement tool
screenshot: screenshot of the map area
Base Layer: set external base maps (among those activated) that you want to make available as background in your WebGis.
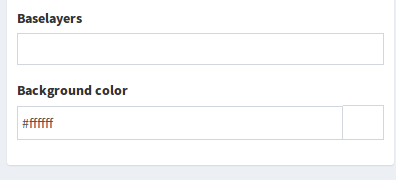
Background color: define the background color.
Now click on the Save button to create your cartographic group.
The group will appear in the list of cartographic groups, also in the frontend area.
Log in to Group Demo and see the list of published project.
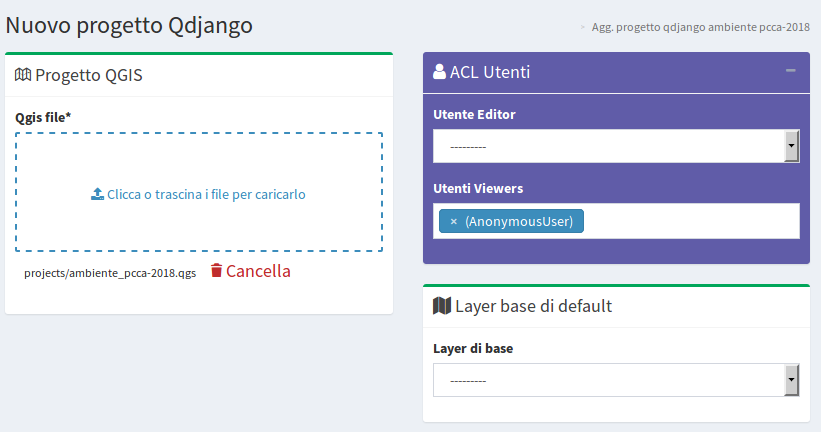
Click on ![]() to publish a new QGIS project and fill the form as described:
to publish a new QGIS project and fill the form as described:
QGIS file: upload your QGIS project
Viewers Users / Users Group: set the Viewer Users or the Viewer Users Groups that will can access to this Project
For freely accessible WebGis, choose Anonymus user.
Base layer: define which external base maps (among those activated in the group) must be active by default.
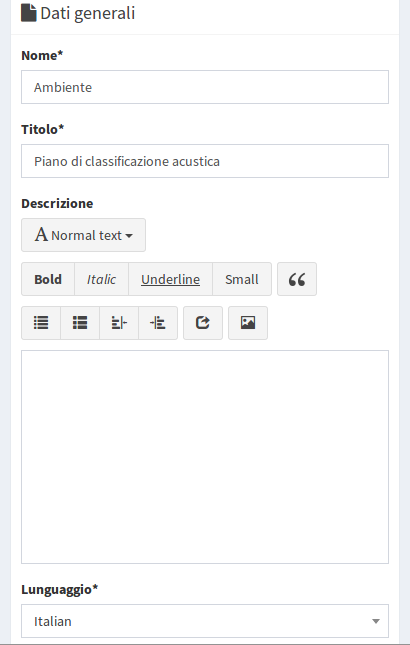
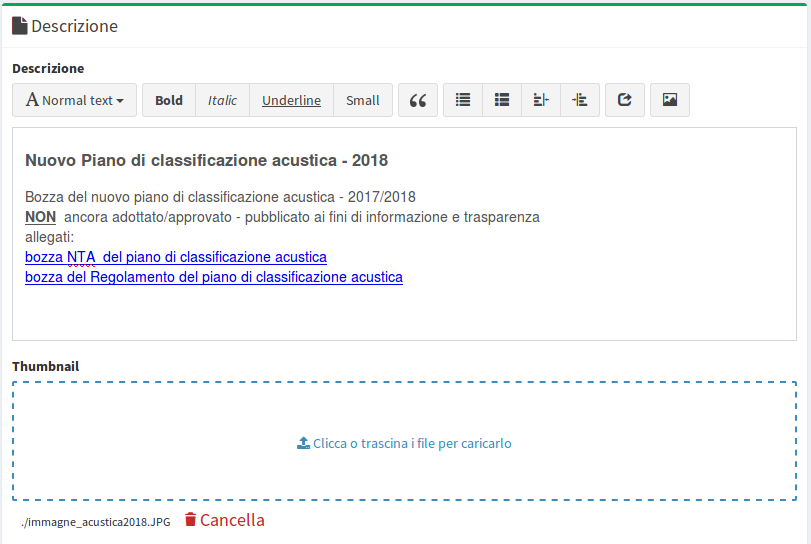
Description: a thematic description of the project (it will appear in the frontend area)
Thumbnail: logo associated with the project (it will appear in the frontend area, in the project list view)7
Now click on Save button to publish your QGIS project.
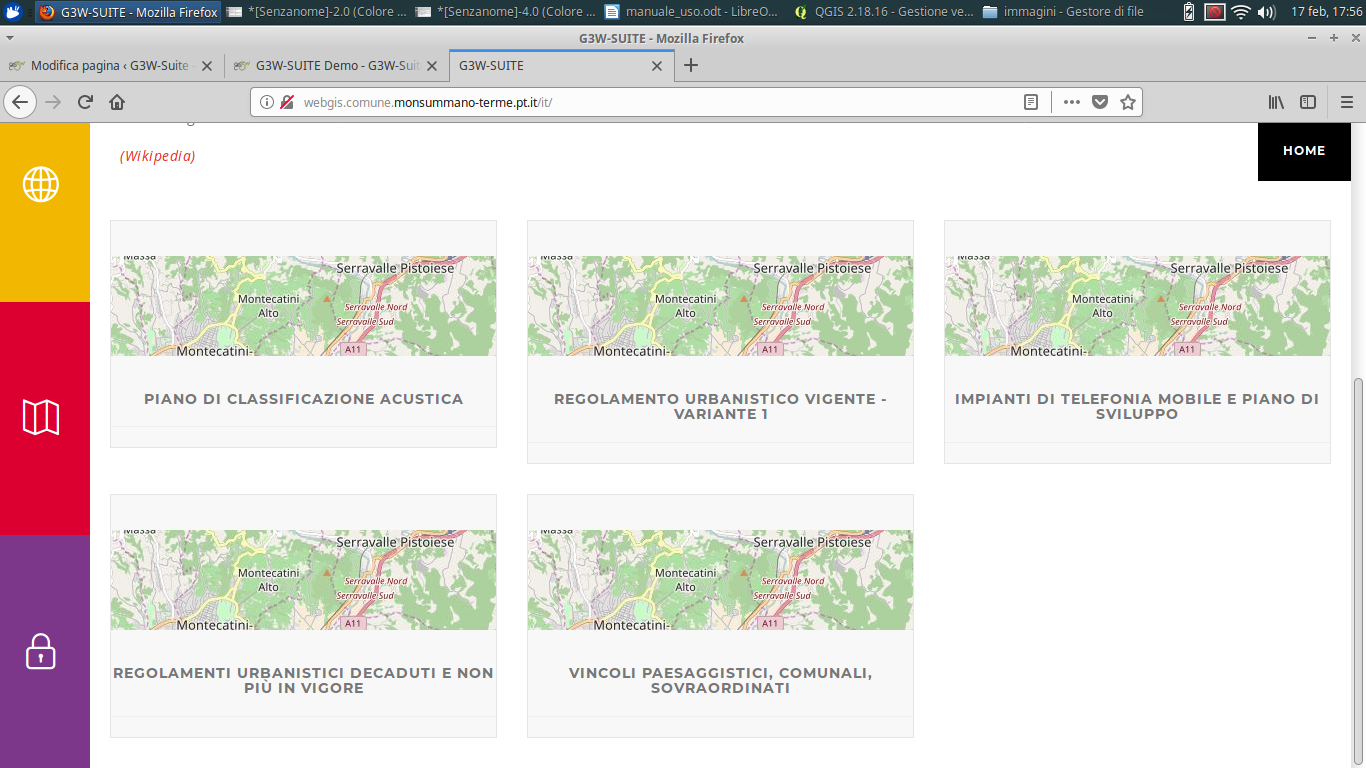
The project will appear in the project list both in the Administration panel and in the frontend area.
Access to the WebGis service to consult the published project and the activated features.
In this paragraph some functional aspects will be illustrated including research, cache, data download.
If you are interested in the aspects of online editing try the dedicated demo
From the G3W-ADMIN Administration panel, access to the Map Group to see the list of the QGIS projects published.
Near at every projects, there are some icons:
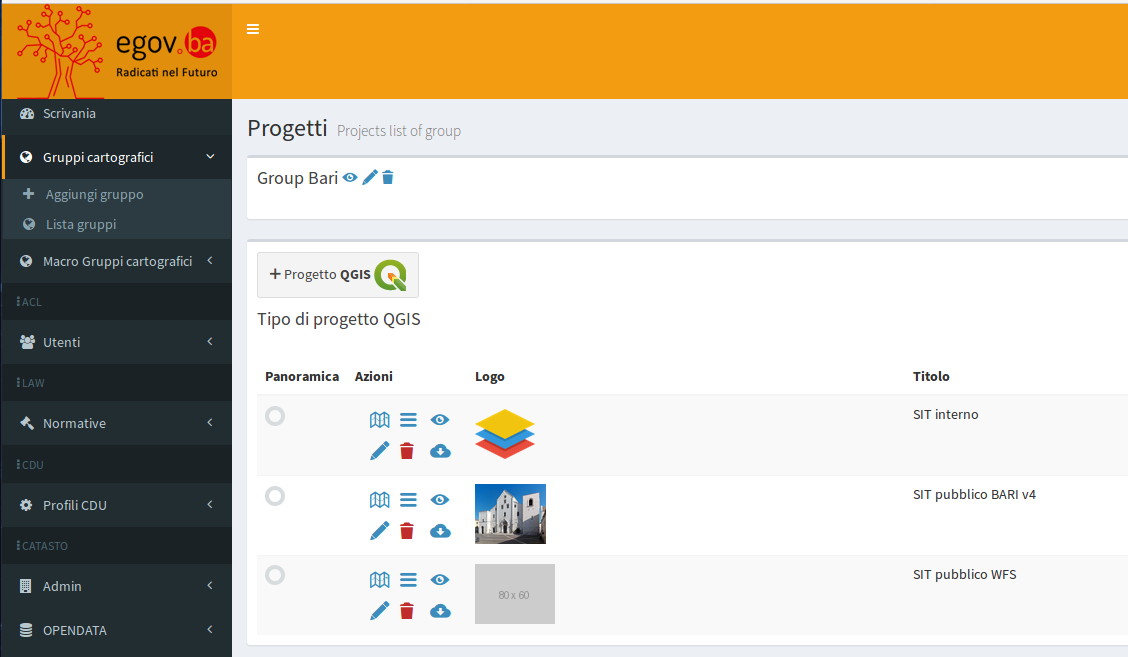
The new window will show the list of layers present in the project with the possibility, for each of them, to manage specific functional aspects
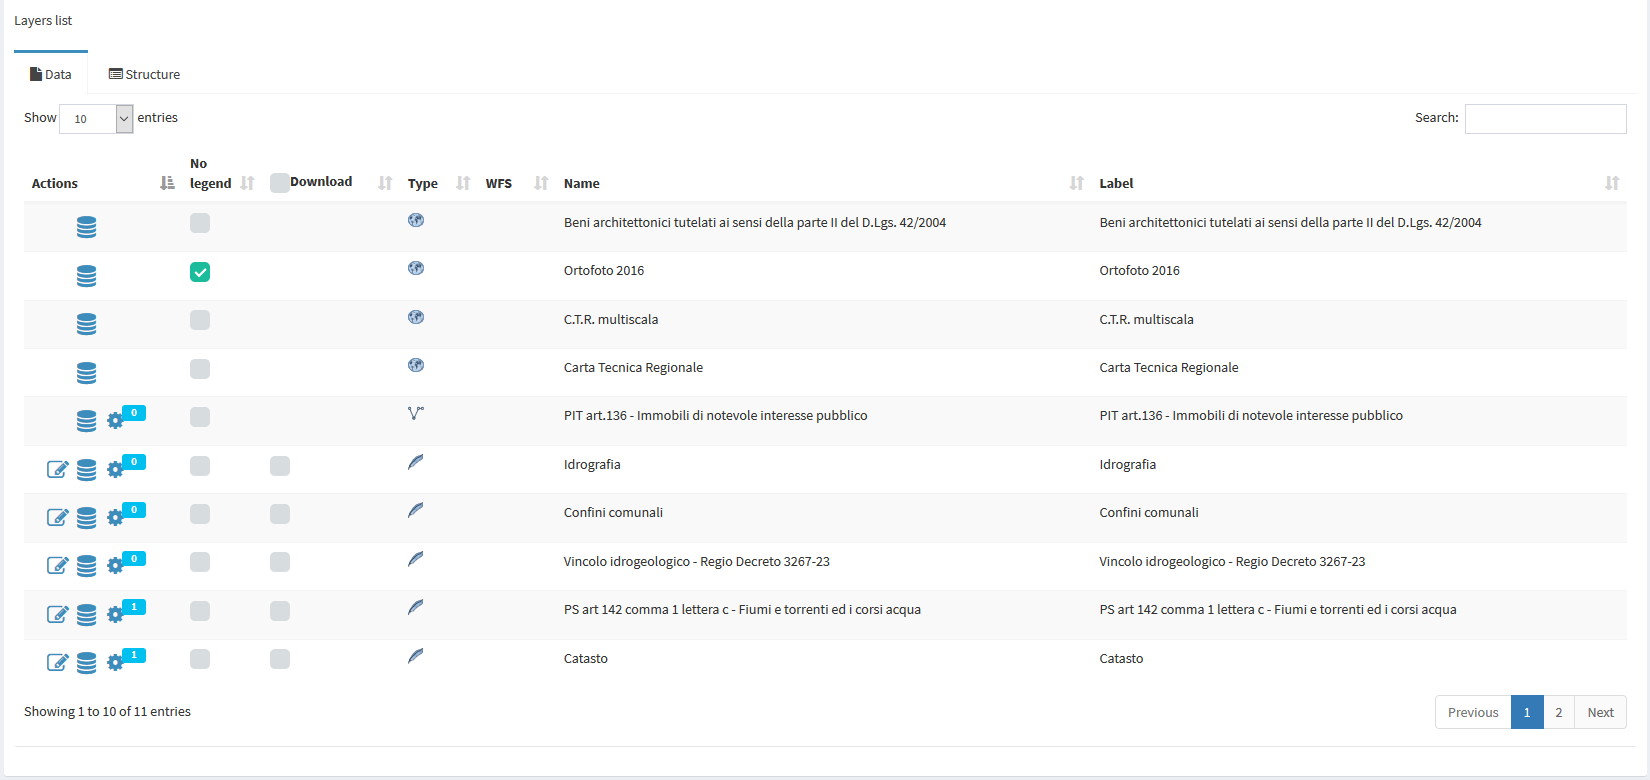
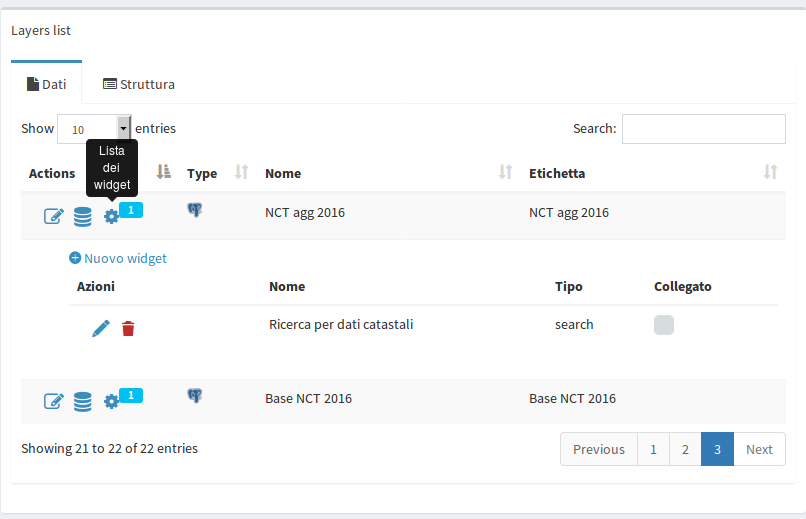
The vector layers are associated with a gear icon (Widgets list) present in the first column on the left.
Choose the layer on which you want to activate a search tool and click on the icon.
The New widgets button will appear, allowing you to create a new search tool by choosing “Search” in the menu Type.
Now you have to fill the form as follows.
Name: identifying name of the search tool
Search tool title: title that will appear in the menu Search in the WebGis
In this session we can set the fields on which the search must act.
You can create a search based on multiple fields by adding others with the green Add button
Field: field on which to apply the search
Widget: kind of value insert: InputBox (manual) or SelectBox (drop down menù)
Alias: the alias to display in the search form
Description: text to display in a descriptive popup
Comparison operator: logical operator to be used in the search SQL
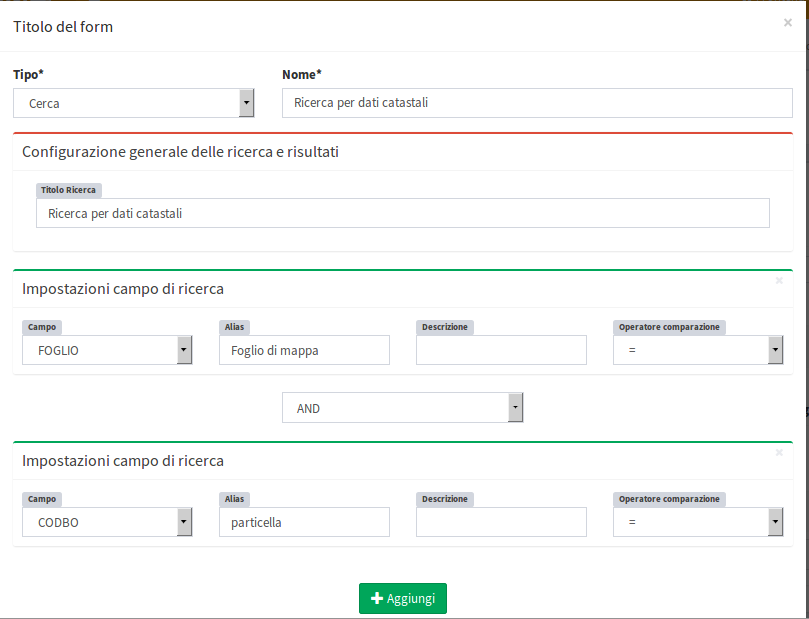
Now you can click on the Ok button to activate the search tool.
The search widget will appear in the list of widgets connected to the layer with Linked option checked.
NB: if you have created a search tools for the same layer in an other project, the search tool will automatically associated with that layer in the new project.
To activate this search tool in the new project, checkbox the Linked option.
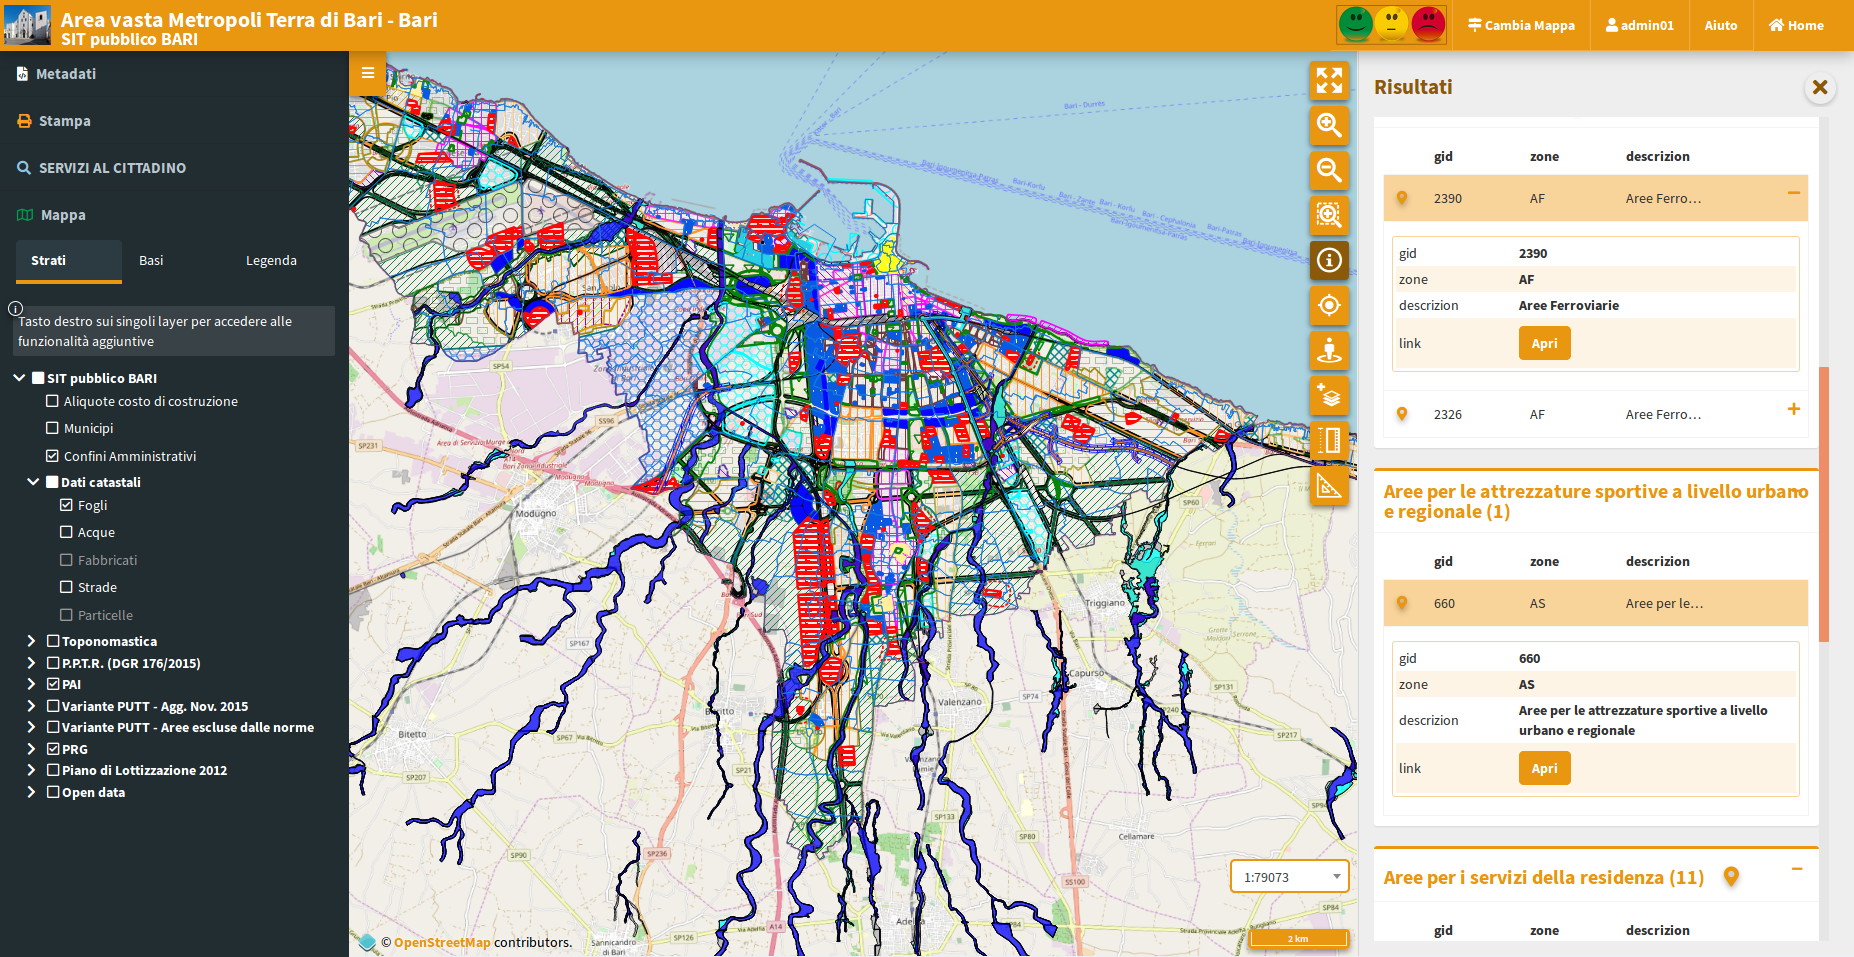
In the WebGis service, the search form will be visible in the left column.
No legend: disable the legend for this layer
Download: enable the download (shp) of this layer: rigth click on the layer on the TOC
Download the application available on GitHub or contact us for a customized installation